State Pattern in Flex
A tutorial on how to implement the State design pattern in Flex 3. We are going to have a traffic light move through several states (red, orange, green). Of course there are other states the traffic light might be in, as well as transitional states (green and orange at the same time), but lets keep things simple!
Note Flex and Flash are discontinued technologies. You can still run
.swffiles locally on your computer using these instructions.
There are four approaches discussed here. The first approach (version 1) uses flash for the graphics and flex for the logic. The second approach (version 2) uses two additional techniques within flex itself (no flash) to decouple graphics from logic. My thanks for Carl de Jager for his assistance in talking through these designs with me and helping to code them.
State Design Pattern
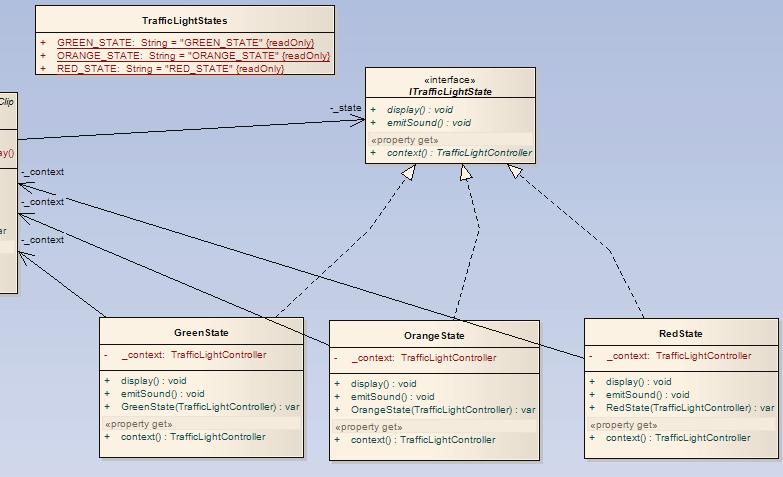
I’m not going to go into the intricate details of state design pattern here, but at least here is the basic classic UML
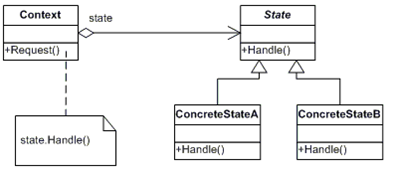
In our case the states will offer a Display() method and an EmitSound() method.
Each concrete state will impement these differently. The client code only knows about the ‘context’ class on the left - it is up to the context class to track which state it is in by holding a reference to a concrete state instance, and switching to a different concrete state instance when the state changes. Client method calls (in our case Display() and EmitSound()) to the context class (in our case called TrafficLightController) are routed to the concrete state instance that happens to be there at the time, resulting in different behaviour depending on the state. Thus we do away with messy if then else logic and as a bonus can plug in future extra states easily without recoding any if else statements.
Version 1
The embedded flash object (showing our demo) is unable to run in modern browsers so an animation is playing instead.
Implementation Steps
So what we do in version 1 is to create both a Flex project and a Flash project. We leverage Flash’s ability to create nice graphics and animations etc. and leave the logic for the superior Flex environment (actionscript 3, more modern architecture, IDE suited for serious OO programmers etc) to handle.
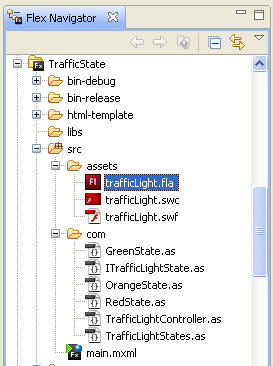
On the flash side of things we create
- Traffic light graphics (red, green and orange circles plus a background)
- Reify a circle graphic as a symbol named ’light’. Create 3 instances of this and change the color accordingly. Name the instances mc_red_light, mc_orange_light and mc_green_light
- Create a combined symbol named ‘TrafficLight’ containing the three lights and a background graphic.
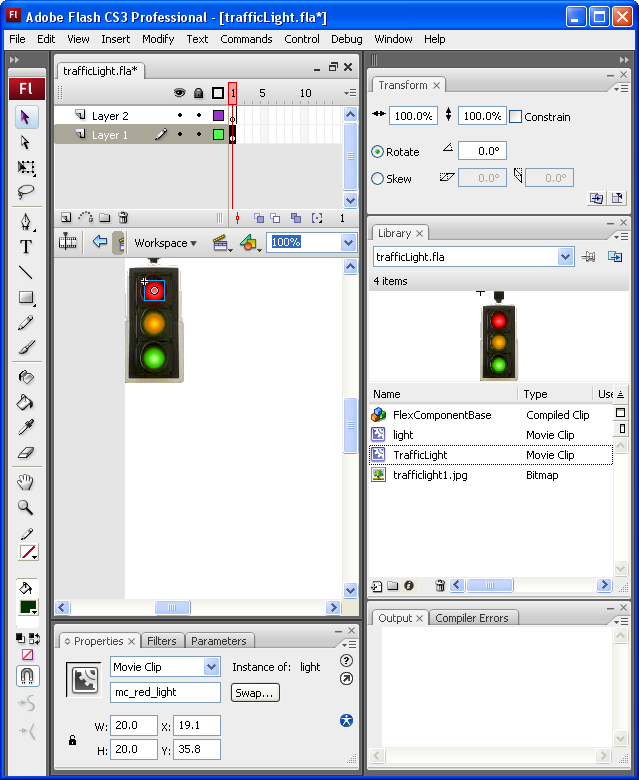
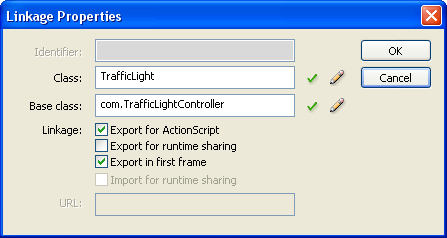
- So that we can refer to the flash symbol from Flex ensure that the TrafficLight symbol in the Library is marked as inheriting from our custom Flex class
com.TrafficLightControllerclass (which we will create below, and which itself inherits frommx.flash.UIMovieClip). In Flash, you can right click on the symbol name in the Library pane to open the Linkage Properties dialog box to see this settings.
We then need to include the flash trafficlight.swc as an asset in our flex project so that we can refer to it from our flex code.
Now we switch over to Flex for the rest of the coding process.
Here is the main flex code
Fire up the main MXML form and enter the following:
main.mxml
<?xml version="1.0" encoding="utf-8"?>
<mx:Application xmlns:mx="http://www.adobe.com/2006/mxml" layout="vertical" xmlns:local="*" creationComplete="init()" width="186" height="300">
	<local:TrafficLight id="trafficLight" width="59" height="138" />

	<mx:HBox>
		<mx:VBox>
			<mx:Button label="show red light" width="100%" click="trafficLight.setState(TrafficLightStates.RED_STATE)"/>
			<mx:Button label="show orange light" width="100%" click="trafficLight.setState(TrafficLightStates.ORANGE_STATE)"/>
			<mx:Button label="show green light" width="100%" click="trafficLight.setState(TrafficLightStates.GREEN_STATE)"/>
		</mx:VBox>
	</mx:HBox>

	<mx:Script>
		<![CDATA[
 import com.TrafficLightStates;

 private function init():void
 {
    trafficLight.setState(TrafficLightStates.RED_STATE);
 }

 ]]>
	</mx:Script>

</mx:Application>
Note that we refer to the flash object with the phrase
<local:TrafficLight id="trafficLight" width="59" height="138" />
Controller code
TrafficLightController.as
package com
{
	import flash.display.MovieClip;

	import mx.flash.UIMovieClip;

	public class TrafficLightController extends UIMovieClip
	{
		private var _states:Array = new Array();
		private var _state:ITrafficLightState;

		public function TrafficLightController()
		{
			super();

			_states = new Array();
			_states[TrafficLightStates.RED_STATE] = new RedState(this);
			_states[TrafficLightStates.ORANGE_STATE] = new OrangeState(this);
			_states[TrafficLightStates.GREEN_STATE] = new GreenState(this);
		}

		// ------------------------------------------------
		// COMMANDS
		// ------------------------------------------------

		public function setState(name:String):void
		{
			_state = _states[name];
			display();
		}

		public function display():void
		{
			switchOffAllLights();
			_state.display();
		}

		public function emitSound():void
		{
			_state.emitSound();
		}

		internal function switchOffAllLights():void
		{
			red_light.visible = false;
			orange_light.visible = false;
			green_light.visible = false;
		}
		// ------------------------------------------------
		// QUERIES
		// ------------------------------------------------

		internal function get red_light():MovieClip
		{
			return getChildByName("mc_red_light") as MovieClip;
		}

		internal function get orange_light():MovieClip
		{
			return getChildByName("mc_orange_light") as MovieClip;
		}

		internal function get green_light():MovieClip
		{
			return getChildByName("mc_green_light") as MovieClip;
		}

	}
}
Traffic Light States
TrafficLightStates.as
package com
{
	public class TrafficLightStates

	{
		public static const RED_STATE:String = "RED_STATE";
		public static const ORANGE_STATE:String = "ORANGE_STATE";
		public static const GREEN_STATE:String = "GREEN_STATE";
	}
}
ITrafficLightState interface
Traffic Light States all follow this interface
ITrafficLightState.as
package com
{
	public interface ITrafficLightState
	{
		function display():void;
		function emitSound():void;

		function get context():TrafficLightController;
	}
}
Concrete states
RedState.as
package com
{
	public class RedState implements ITrafficLightState
	{
		private var _context:TrafficLightController;

		public function RedState(context:TrafficLightController)
		{
			_context = context;
		}

		public function get context():TrafficLightController
		{
			return _context;
		}

		public function display():void
		{
			context.red_light.visible = true;
		}

		public function emitSound():void
		{
		}
	}
}
GreenState.as
package com
{
 public class GreenState implements ITrafficLightState
 {
 private var _context:TrafficLightController;

 public function GreenState(context:TrafficLightController)
 {
 _context = context;
 }

 public function get context():TrafficLightController
 {
 return _context;
 }

 public function display():void
 {
 context.green_light.visible = true;
 }

 public function emitSound():void
 {
 }
 }
}
OrangeState.as
package com
{
 public class OrangeState implements ITrafficLightState
 {
 private var _context:TrafficLightController;

 public function OrangeState(context:TrafficLightController)
 {
 _context = context;
 }

 public function get context():TrafficLightController
 {
 return _context;
 }

 public function display():void
 {
 context.orange_light.visible = true;
 }

 public function emitSound():void
 {
 }
 }
}
How it works
The flex code within the concrete state classes ends up setting the visibility of the individual flash graphic components. Remember the flash graphics are really dumb and have no logic in them. The flex code refers to the flash graphic symbols with the following technique
return getChildByName(“mc_red_light”) as MovieClip;
which dynamically looks up the graphic and hands it to the flex code which then sets the .visible property as needed. Ironically the code that drives the flash color changing lives in the TrafficLightController class, as a bunch of utility methods that the concrete state classes call upon. Note also that the EmitSound() method is not implemented in this project.
UML
Here is the UML of the solution. Click for larger image.
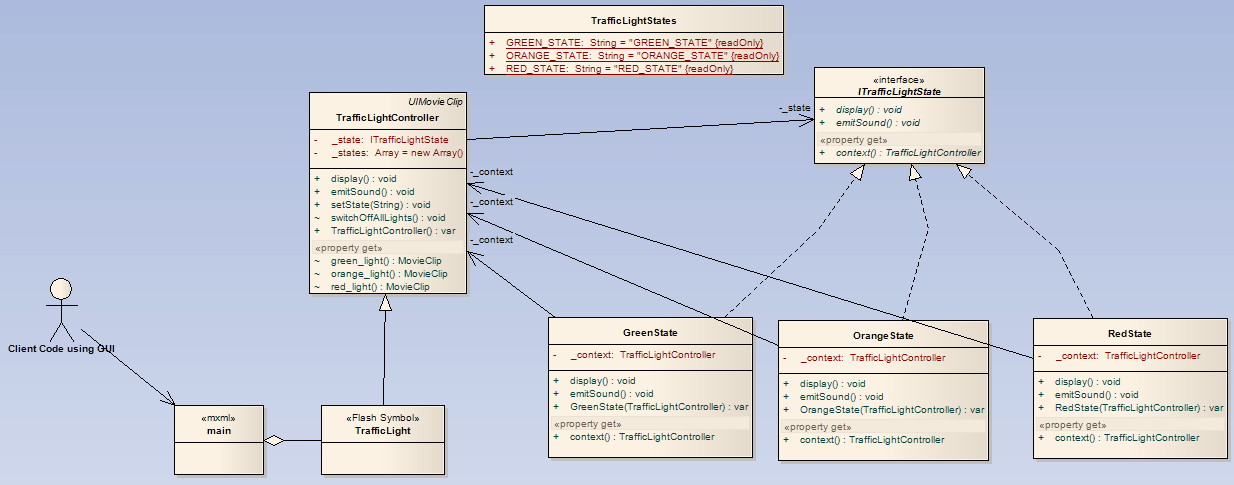
Note how the user drives the flex MXML form which holds a reference to the flash object. See how the flash object inherits from the TrafficLightController class thereby we auto-magically graft on smart behaviour to the dumb flash symbol.
The TrafficLightControllerclass is the ‘context’ in our State design pattern and holds an instance of a state object. The states are singletons kept in an array, so that we don’t have to keep creating and deleting state instances (this is a common implementation trick when implementing state pattern).
Version 2
Just to be bold and learn flex more deeply, here are another three solutions to implementing the traffic light using design state pattern in flash and flex. I have created three different implementations within the one architecture. We use the following techniques:
- Accessing a flash component (as before) but now with skinning
- Pure Flex solution with the graphics as images assembled purely in MXML, code inside the mxml file
- Pure Flex solution, graphics in MXML, code in a separate proper flex class - using a technique known as ‘code behind’
Here is the resulting flash application - go on and click on the buttons!
The embedded flash object (showing our demo) is unable to run in modern browsers so an animation is playing instead.
Implementation Steps
I won’t list all the code, however here is the MXML file for the all in one solution version
<?xml version="1.0" encoding="utf-8"?>
<mx:Canvas xmlns:mx="http://www.adobe.com/2006/mxml" implements="com.ITrafficLightView" width="59" height="138" initialize="init()">

	<mx:Image x="0" y="0" source="TrafficLightSkin_box"/>
	<mx:Image id="red_light" x="19" y="36" source="TrafficLightSkin_red_light"/>
	<mx:Image id="orange_light" x="19" y="69" source="TrafficLightSkin_orange_light"/>
	<mx:Image id="green_light" x="19" y="103" source="TrafficLightSkin_green_light"/>

	<mx:Script>
		<![CDATA[

			private var _controller:TrafficLightController;

			private function init():void
			{
				setController(new TrafficLightController(this));
			}

			public function setController(val:TrafficLightController):void
			{
				_controller = val;
			}

			public function setState(val:String):void
			{
				_controller.setState(val);
			}

			public function emitSound():void
			{
				_controller.emitSound();
			}

			public function display():void
			{
				_controller.display();
			}

			public function getController():TrafficLightController
			{
				return null;
			}

			public function setRed():void
			{
				switchOffAllLights();
				red_light.visible = true;
			}

			public function setOrange():void
			{
				switchOffAllLights();
				orange_light.visible = true;
			}

			public function setGreen():void
			{
				switchOffAllLights();
				green_light.visible = true;
			}

			// HELPERS

			internal function switchOffAllLights():void
			{
				red_light.visible = false;
				orange_light.visible = false;
				green_light.visible = false;
			}
		]]>
	</mx:Script>

</mx:Canvas>
UML
Here is the UML of the solution. Click for larger image.

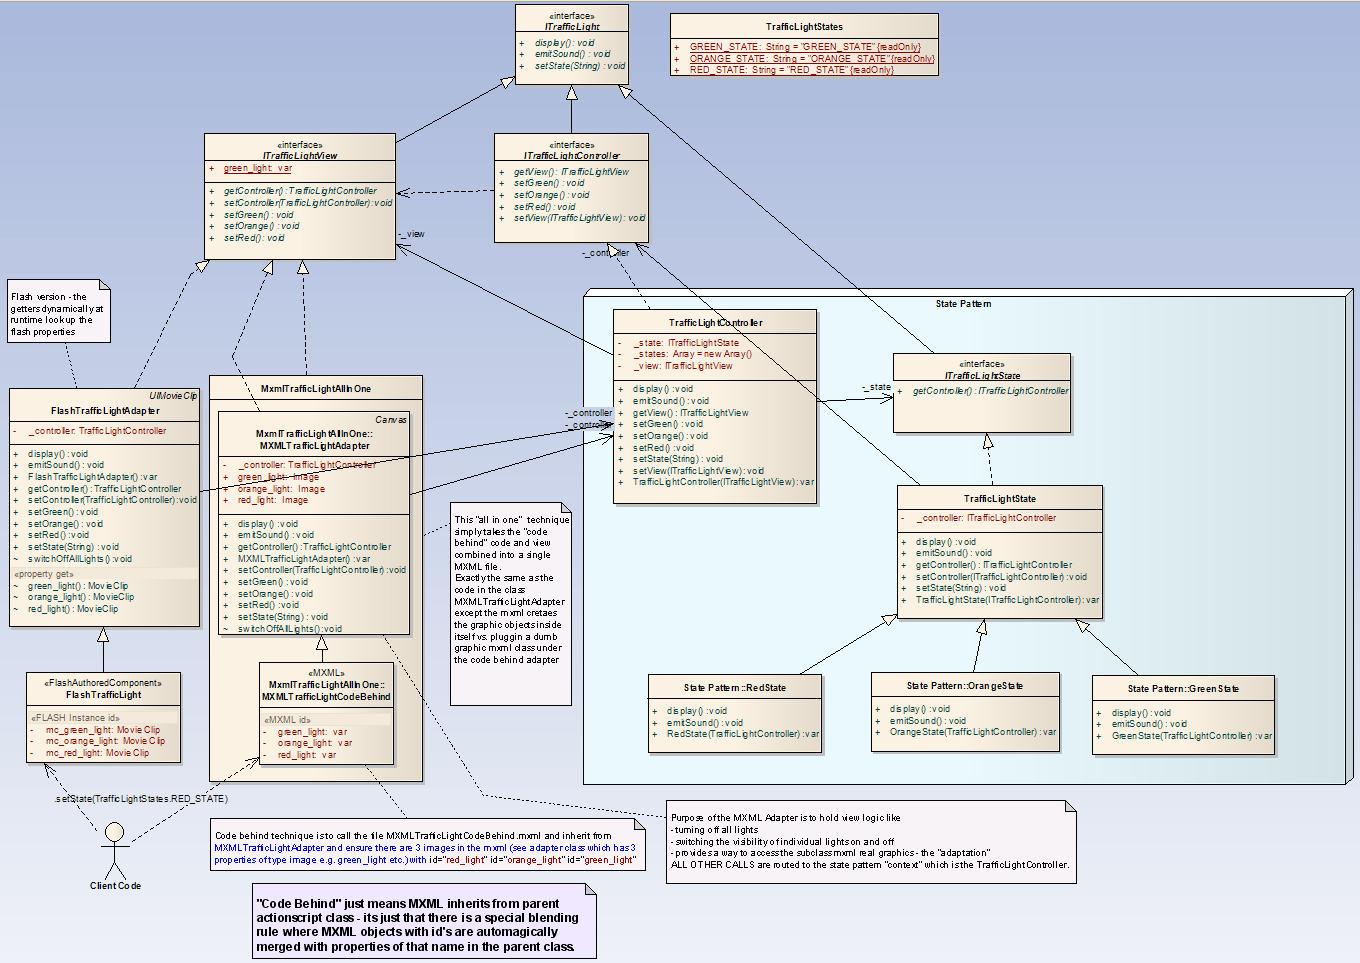
Why is the above UML so complex?
Because we are trying to implement three different techniques in the one example, the UML gets complex. In all cases the state design pattern model logic is the same, which is good code reuse. We use adapters (another design pattern) to accommodate three different implementations within the one architecture, which itself is pretty cool.
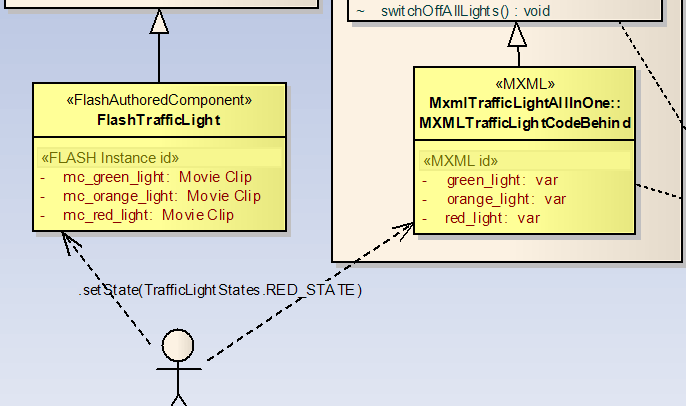
Note that the classes handling the graphics display (red/orange/green lights and associated buttons) are actually fairly lightweight, and indicated in dark yellow.
The complexity is really in the “adapter” classes above them which house the code to implement the ITrafficView interface (allowing for our 3 variant implementations in the one architecture approach) and which allows the graphic classes to remain dumb and small.
The benefit of this approach (besides learning about how to do the same thing in different ways within flex and thereby understanding flex better) is that we can change the graphic implementation at any time without changing our core business logic model, and our state design pattern (which resides in the model) also remains stable.
Resources
Flex Project zip.